Episode 289: Using Service Hub for Internal Business Processes
Welcome to HubShots Episode 289: Using Service Hub for Internal Business Processes This edition we dive into:
If you're new to HubSpot, we guide you on where to start, how to do it right, and train you to make the most of the platform.
Review your HubSpot portal to uncover issues, spot growth opportunities, and ensure you're maximising its potential.
Unlock business growth with automation and attribution. Implement best practices and execute marketing campaigns.
HubSpot On-Demand
HubSpot Training
HubSpot Websites
HubSpot Campaigns
Virtual HubSpot Manager
17 min read
XEN Systems 10 May 2022 9:00:00 AM
This edition we dive into:
You can watch this episode on our YouTube channel (or just listen to it on our YouTube audio channel) or here:
We’re also available on Spotify or Soundcloud if that’s easier for you.
Did a colleague forward this episode to you? Sign up here to get yours every Friday.
Please forward this on to your work colleagues.
Recorded: Wednesday 04 May 2022 | Published: Friday 06 May 2022
This is a massive episode - the show notes for this episode alone is approximately 5000 words. So feel free to bookmark this or flag it to return to later.
If you look up the general definition of a campaign you’ll be greeted with things like:
The key point is about achieving an objective.
Which is actually quite helpful.
However, using the term in marketing circles can be confusing.
That’s because the word ‘campaign’ can mean many things in the marketing world, including:
Which means things can get confusing if we don’t specify what ‘campaign’ means when we’re discussing things.
Otherwise it just feels like a campaign is:
For this episode we’re going to walk through setting up a ‘campaign’ in HubSpot, which will include:
Which is promoted via:
And reported via:
For ease, we usually group these items into the following categories:
The following list gives an overview of all the key items across each of the main categories. You can access our Google doc which has these all detailed (it’s a Google doc which we are constantly updating and improving - feel free to make a copy for yourself)
In this episode we are going to focus on the IMPLEMENT items - all built in Hubspot.
However, it’s worth noting that you can only IMPLEMENT items after you’ve done the upfront PLANning of what you want to achieve.
It’s important that you are clear at the start about:
We won’t be discussing the PLAN items in this episode, but do want to stress the importance of those items.
One final thing before we jump into the HubSpot implementation items.
Get this right now - thank me later.
Let’s quickly chat about naming conventions. Having a consistent naming convention to apply to files, pages, CTAs, emails, lists, reports etc will save you time (and heartache) later.
There’s no agreed format for naming items - it’s usually very specific to each business - however there’s a few common approaches we’ve used with clients over the years.
The naming usually includes:
We usually use pipes (ie ‘|’) or slashes (ie ‘/’) to break up the naming in items.
In the screenshots through the notes below you’ll see examples of different naming conventions we use.
OK, let’s get started.
The first item to organise is the form you’ll be using on your landing page.
If you have a standard form you use for your landing pages already, great, you can skip this step, but if not:
Key things to remember:
There’s some considerations to make when building out an initial form with regard to how many fields you use (and make mandatory).
A simple form will likely have a higher conversion rate, whereas a more complex set of fields will likely provide better qualified contacts. This, combined with the value of the asset you are offering will help you find the right mix.
We typically include at least the following fields on forms in B2B campaigns:
Depending on where the content asset is in terms of a buyer’s journey, we may add further fields to help qualify them eg:
Progressive Form fields allow you to switch out a form field if it is already known.
It’s a handy way to keep your forms from being overwhelming.
All you need to do is add a ‘queue’ of other fields to your form. And then, if a non-mandatory field is already known (Eg perhaps you have Job title as an optional form field) it is switched out for the next field in your queue of fields (Eg perhaps you have Twitter handle as a progressive field).
(See also our discussion in episode 277)
Behavioural Targeting allows you to ensure the form only shows where it is relevant (and not appear all the time for everyone).
Common examples include:
Here’s a simple example of setting the targeting on a Newsletter popup form:
The lists tool in HubSpot allows you to create a list of contacts or companies based on property values and other characteristics, including activities and already being part of another list (ie you can build lists of lists).
Some examples of common lists we create will make it easier to understand.
Here’s a simple example of an active list that includes contacts who have filled out a particular form:
You can then further filter based on date ranges eg: only show the form submits in the last 14 days
Here’s a simple list of existing contacts who have viewed a particular page:
Here’s a list of lists:
And just to make it even more powerful, here’s an example of a list of lists (ie the List above), used in a a new list and combined with engagement criteria:
We could even refine it further to just include those engaged subscribers who have visited in the last week:
You could also create lists based on lifecycle stage:
When setting up lists for campaigns we typically build lists for the following:
Main takeaway: Lists are your friend! They are very flexible and powerful.
And as you’ll see later they form the basis of reporting about the success of your campaigns.
As well as lists of who to INCLUDE, we can also build lists of contacts we want to EXCLUDE (eg to exclude them from reports or workflows).
Here’s some of the exclusion lists we typically prepare as well:
HubSpot has a very familiar file system for uploading content assets (eg PDFs, videos, images).
A few tips:
Most campaigns have at least two, sometimes three landing pages implemented:
Note: depending on your preference, you may decide to combine the Thank you page and Download page into a single page. Ie the TY page has the download on it as well.
Whether you decide to use two pages versus three pages usually depends on whether you are getting a lot of junk requests (eg people entering junk email address just to access the TY page). If that’s the case, then having a TY page that just indicates they need to check their Inbox is a good option. It means the email address has to be real in order for the contact to then access the Download (DL) page.
Aside: if you are getting a lot of junk email submissions it likely indicates a separate problem, such as having inappropriate promotion targeting, or asking for too many details on the form.
In most campaigns these days we combine the TY and DL page into one, and only have a total of two pages. But the choice is yours.
Search for landing page best practices on Google and you’ll get no end of recommendations - including HubSpot’s own article.
We won’t go through all the suggestions here, but one that I want to comment on this:
Most articles on landing pages will recommend you keep them as simple as possible and keep navigation (ie menus) to a minimum. HubSpot certainly recommends that, as does Unbounce.
I want to challenge this a little and simply suggest you test and measure. Conventional wisdom isn’t always a global thing. So whilst it may be appropriate in some industries, that doesn’t necessarily mean it applies in yours. If you are able to test two versions of the page - one with navigation and one without - then go for it.
If you aren’t able to test, then just go with conventional wisdom and reduce navigation for now.
Well we want to start with the end in mind. But also helps us complete the process more seamlessly when you have it created and you can link it from the landing page when you create it.
According to WordStream, the average landing page conversion rate is 2.35% across industries, with the top 25th percentile of landing pages hitting 5.31% or higher.
One of the lesser used features of HubSpot is the Call To Action (CTA) function.
Think of these as signposts and markers along the path to get users to take action.
Here is what a Multivariate Test on a CTA looks like in HubSpot.
Strictly speaking you don’t need to use HubSpot CTAs in your campaigns - you can easily just use links and buttons.
The benefits of using CTAs include:
The first email you’ll need to build for your campaign is a simple ‘thank you’ email.
The goal of the Thank You email email is to:
Here’s a simple example of a TY email we send when you sign up for our show notes:
You’ll find a lot of advice on how to prepare emails, so we won’t go through any details here. Instead, just some simple recommendations:
Include key properties that aren’t part of standard form submit notification eg
A lead nurture email sequence is a series of emails that is automatically triggered when a contact (lead/customer) takes a certain action. Here are some examples of nurture sequences:
Here are some best practices from HubSpot:
You are probably wondering how many emails should be in the sequence? This really depends and can vary from 3+ email based on different time frames.
Workflows are the key to scalability in your business, so getting them set up correctly is important for future growth.
Workflows - as you likely know - allow a series of ‘actions’ to be initiated automatically. Actions can include things like:
There’s three main parts to a workflow that you need to be aware of:
There’s other considerations such as the different types of workflows (Eg date based, deal based, ticket based, etc) but in this episode we are only going to focus on a standard contact workflow.
Here’s an example of possibly the simplest contact workflow you could build:
It has simple entry criteria:
and two simple actions:
The criteria for initiating the workflow is important to think through - especially if you are just getting started.
Through experience we’ve learned that the more specific you can be when setting criteria, the less hassles you have in the future.
Here’s a recent example: a customer had some old workflows set up years ago that had a trigger of ANY form being submitted on ANY page, and then a list of exclusions (eg but NOT this form, and NOT that form etc).
For the first few years this was fine - their list of forms and landing pages was small and manageable. But when they rapidly grew it became a problem. When we started working with them they had more than 100 forms in their portal across 100s of landing pages. The old workflow had a massive set of exclusions that were unwieldy. The solution was reasonably simple: completely rework the entry criteria to only trigger on a select set of the forms and landing pages.
So here’s the tips for your entry criteria:
This is one of the most overlooked items we see on workflows.
Re-enrollment is a very useful setting for letting contacts go through the workflow again. A common example might be if a person fills out the form again in the future. We want to send them the download details again.
Here’s a very simple example for our HubShots Subscribe workflow. If you subscribe again in the future (perhaps you had unsubscribed previously) we’ll send you our TY email again:
The other benefit of enabling re-enrollment settings is the Manually enrolled setting - we suggest you always have this ticked on - it means you can easily manually enroll a contact into a workflow right from their contact record.
Yes, you can definitely use lists as Workflow Trigger criteria (and we often do).
However, there is a potential trap you can fall into (I did early on). Let’s assume you’ve created Active lists for the people who have submitted the appropriate form(s) related to this campaign, so why not just use that list as the trigger criteria?
It makes sense right?
Here’s the issue: re-enrollment criteria won’t fire if they come back and fill in the form again later.
Although it is less common, we’ve probably all had that experience where we fill out a form for an ebook and get the TY email, which we promptly forget about.
A week or two later we return to the landing page (perhaps we had it bookmarked, or saw a social post about it) and fill out the form again. We expect to get the TY email again with the link to the PDF.
If the workflow criteria is based only on a list, that TY email won’t be sent again, because the contact was already part of the list (and thus didn’t trigger the entry criteria)
Which is why for workflows based on a form submit we always use the form submit as trigger criteria. But we will often ALSO use Lists as well.
The final item to mention is the Unenrollment settings on workflows.
For most of the portals we manage we set up a global suppression list of contacts. This usually includes:
We then use these global suppression lists in some of our campaign workflows:
Goals are feature in contact workflows (they don’t appear in Deal workflows for example) that serve two purposes:
Here’s the common actions we use in workflows that are used in campaigns:
Since workflows can be used to call other workflows, we often use the words PARENT or CHILD in workflow names. If a workflow is only being called from other workflows (Eg it has no entry criteria of its own) we will often name it as a CHILD workflow so that it is obvious to anyone viewing a list of workflows. It also makes it easier to search and find just the workflows that are called from other workflows.
Workflows are one of our favourite topics to chat about on the show. For more tips, check out:
It allows you to tag related marketing assets (Ad Campaigns, CTAs, lists to name a few) and content (landing pages, website pages) so you can easily measure the effectiveness of your collective marketing efforts.
This then unlocks the ability to view attribution for the campaign across all those items.
You may be wondering why the HubSpot Campaign is created towards the end of the list of items.
Previously we used to create this early, however now that HubSpot has added the option to easily add Assets (when in the campaign tool) it’s fine to leave creating the campaign till the end. And then add all the assets at once:
Add assets across items and ad campaigns:
Knowledgebase on how to setup a campaign in HubSpot
Once the campaign assets are implemented, it can be added to various places around the site to aid in promotion.
If the campaign is a time constrained one (eg you are running a webinar next month), you may only have some CTAs showing in a few places temporarily. For longer term, evergreen campaigns (eg an industry study whitepaper), you might want to add references in menus, footers and sidebars.
Probably the simplest way to promote widely across your site is a banner or CTA in the blog sidebar (if you have one). Here’s a simple example of a sidebar banner:
Other places to update include:
You can also look to include mentions of the offer in:
One of the benefits of setting up a number of Lists (see Shot 4 above) is you can use these lists in HubSpot Reports.
HubSpot includes a ton of pre-prepared reports you can use - simply find them in the Report library.
You can also create your own Custom reports.
When creating Custom reports, you can easily pull from your Lists:
Add it to your Filters criteria:
The beauty of this approach is that you can easily update criteria in a list and it will flow through to any reports based on the list.
Typical reports you can create (or customise from the Report Library) include:
HubSpot’s Custom Report functionality is getting more powerful each month, and worth taking the time to get up-to-speed (even though it can be a bit overwhelming at first).
You also now have Campaign properties available to add in custom reports
Example of a default report that you can customise, Campaigns by contacts created:
Plus here are some of the options to narrow down the report, by asset types, campaign, interactions and the importance that lists could play to get what you want:
You can schedule individual reports to be emailed to users.
Dashboards are simply a collection of HubSpot reports. Plus the ability to:
Add reports to dashboards with data that is relevant to you & your organization from the report library:
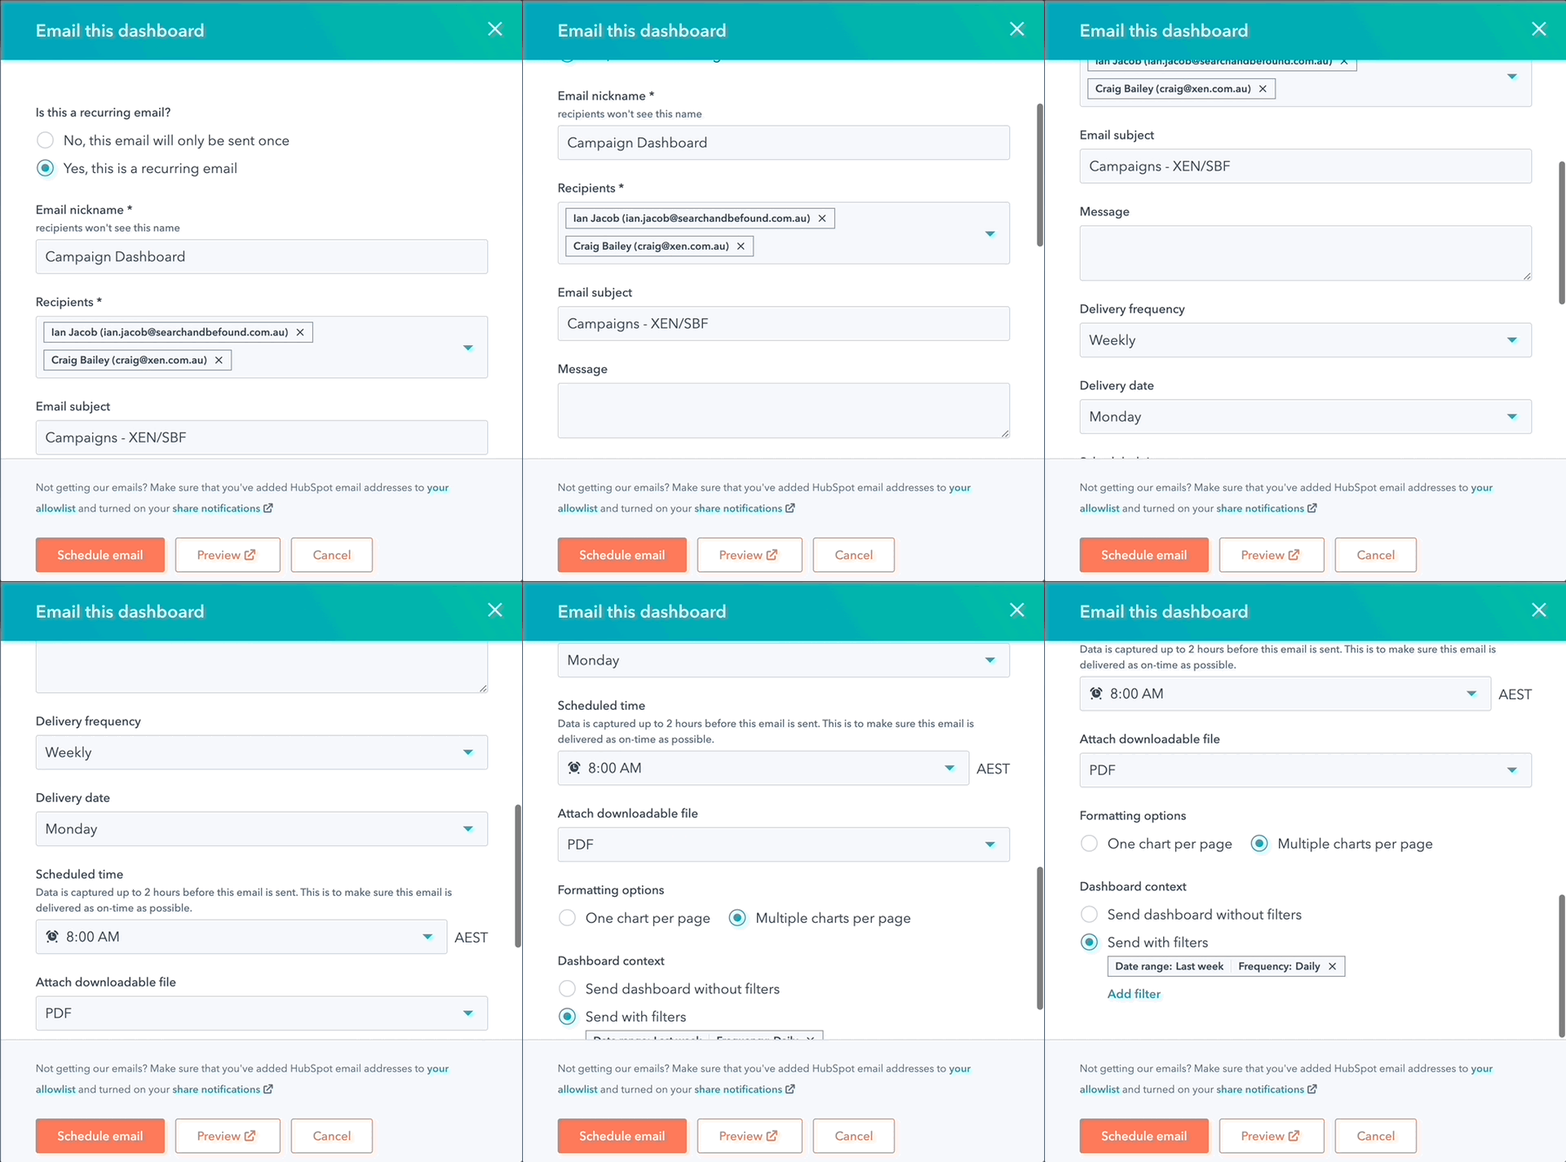
Schedule weekly dashboard emails
“Many companies have forgotten they sell to actual people. Humans care about the entire experience, not just the marketing or sales or service. To really win in the modern age, you must solve for humans.” — Dharmesh Shah, CTO & Co-Founder, HubSpot
Connect with HubShots here:
Connect with Ian Jacob on LinkedIn and Craig Bailey on LinkedIn
HubShots, the podcast for marketing managers and sales professionals who use HubSpot, hosted by Ian Jacob from Search & Be Found and Craig Bailey from XEN Systems and XEN Solar.
HubShots is produced by Christopher Mottram from Podcastily.
Please share this with colleagues - it helps us improve and reach more marketers.
Welcome to HubShots Episode 289: Using Service Hub for Internal Business Processes This edition we dive into:
Welcome to HubShots Episode 279: HubSpot Forms Best Practices (for Building Marketing Campaigns) This edition we dive into:
Welcome to HubShots Episode 283: HubSpot Top Tips August 2022 Edition This edition we dive into: